Monday, December 17, 2012

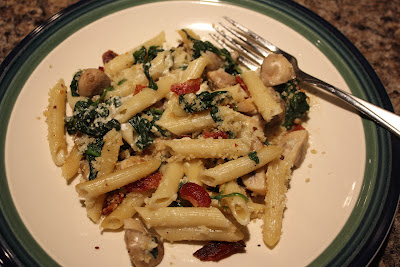
Steak House Mac and Cheese

Anyone up for some comfort food (with a healthy twist)?  When I saw this recipe in March, I knew I had to try it immediately.  I have made it several times (once, when my mother-in-law came for dinner) and I cannot say enough good about it.  Spinach.  Bacon.  Mushrooms.  Blue Cheese.  I have found those to be ingredients people either love or hate, but I happen to love them all.  Put them together with some penne, greek yogurt, panko, and garlic?  Let me tell you...This dish is amazing.

INGREDIENTS:

  • 4 tsp olive oil, divided
  • 2 tsp salt
  • 8 oz uncooked penne pasta or macaroni
  • 3 bacon slices (I have reserved some from Sunday morning breakfast when I make it)
  • 10 oz fresh mushrooms, quartered (I have used more, depending on the package size)
  • 1/4 tsp freshly ground black pepper
  • 2 cloves garlic, minced (I use 1 tsp jarred minced garlic)
  • 10 oz fresh baby spinach (I used most of two 6 oz bags)
  • 1/4 cup plain 2% Greek yogurt
  • 4 oz blue cheese, crumbled
  • 1/2 cup panko (Japanese breadcrumbs)
  • 2 Tbsp chopped fresh parsley (I don't generally have this and therefore skip it)
DIRECTIONS:
  1. Preheat oven to 400 degrees.  Coat 2-quart baking dish with 1 tsp oil and set aside.
  2. Bring a large pot of water to a boil; add salt and pasta.  Cook for 6 minutes or until just barely tender.  Drain pasta but reserve one cup of the cooking liquid.
  3. While the water is coming to a boil, cook bacon in a large skillet over medium heat until crisp.  Remove bacon from pan, and crumble.  Add mushrooms to drippings (appx 2 Tbs) in pan.  Cook for 8 minutes or until browned, stirring occasionally.  
  4. Add pepper, garlic, and spinach (in batches) to the mushrooms; cook 3 minutes or until spinach wilts, tossing occasionally.
  5. Combine yogurt and cheese in a large bowl, stirring until almost smooth.  Add pasta and mushroom mixture toss to combine.  Stir in 1/2 cup reserved cooking liquid (or more if mixture looks dry).  Spoon pasta mixture into prepared dish.
  6. Combine crumbled bacon, panko, and parsley.  Drizzle with remaining 3 teaspoons of oil; toss to combine.  Sprinkle evenly over top of pasta.  Bake at 400 degrees for 20 minutes or until golden and bubbly.

Difficulty: medium
Time: about 50 minutes total (the last 20 of which are completely hands-off)
Source:  Cooking Light magazine, March 2012, page 81

Saturday, December 15, 2012

Old-fashioned Orange Cookies

As the granddaughter of a baker, I love cookie season! I enjoy trying new recipes and filling the house with many, many dozens of treats to deliver to friends and family. This recipe came from my first ever cookie exchange when (gulp) I actually bought cookies from my grandfather's bakery instead of making my own. If you are intimidated by cookies like I was, try organizing a community or work cookie exchange; it is a great way to score some good recipes!

INGREDIENTS:


Cookie Ingredients
  • 2/3 cup shortening
  • 3/4 cup sugar
  • 1 egg
  • 1/2 cup orange juice
  • 2 T orange rind (Valencia orange rinds provide the most flavor)
  • 2 cups flour
  • 1/2 t each: salt, baking powder, baking soda
Icing Ingredients
  • 2 1/2 T butter (softened)
  • 1 1/2 cup confectioners sugar (I've had success with Domino)
  • 1 1/2 T orange juice
  • 2 t orange rind
DIRECTIONS:
Cookies (4 dozen, 2-inch cookies)
  1. Mix shortening, sugar, and eggs until creamy.
  2. Stir in orange rind and orange juice.
  3. Blend in dry ingredients.
  4. Drop by teaspoonful onto an ungreased cookie sheet.
  5. Bake at 400 degrees Fahrenheit for 7-8 minutes.
Cookie Icing
  1. Mix the butter until creamy.
  2. Slowly add confectioners sugar and orange juice.
  3. Mix until blended well.
  4. Stir in orange rind.
Note: I recommend investing in a grater; mine is handheld with a container to collect the rind.


Difficulty: Medium (you do have to grate an orange)
Time: Start to finish about an hour
Source: Work Cookie Exchange

Monday, December 10, 2012

Chewy Chocolate Cookies

I have made a few recipes similar to this one over the years for my cookie tray and to mix in with others as gifts.  It is a perfect addition, with the festive candy cane sprinkles on the top.  The nice thing about this recipe is if you don't care for the candy cane topping, you can substitute whatever you would like - half of a caramel, walnut or pecan pieces (or halves), a drizzle of melted chocolate...you name it, and it will probably work.  I love the chewy, almost brownie-like texture...delicious!

INGREDIENTS:
  • 4 squares Baker's Unsweetened Baking Chocolate
  • 3/4 c butter
  • 2 c sugar
  • 3 eggs
  • 1 tsp vanilla
  • 2 c flour
  • 3 or 4 coarsely chopped peppermint candy canes (or other topping of your choosing)
DIRECTIONS:
  1. Preheat oven to 350 degrees.
  2. Microwave chocolate and butter in large microwavable bowl on HIGH for 2 minutes or until butter is melted.  Stir until chocolate is completely melted.  (At this point, I transfer to the mixing bowl of my stand mixer.)
  3. Stir in sugar.  Blend in eggs and vanilla.  Add flour; mix well.  Refrigerate 15 minutes, or until dough is easy to handle.  (This is very necessary.  I actually put the dough back into the fridge between batches.)
  4. Shape dough into 1 inch balls; place 2 inches apart on greased baking sheets.
  5. Bake 8 minutes or just until set (do not overbake).  Once removed from the oven, immediately sprinkle candy cane bits onto the top and press into the cookie slightly.  Transfer to wire racks and cool completely.  Makes about 5 dozen cookies.

Difficulty: Pretty easy on a cookie scale (only the rolling into balls keeps it from being very easy, in my opinion)
Time: 15 minutes prep, 8 minutes cooking time per batch
Source: adapted from Kraft Food & Family magazine, Holiday 2006 edition

Thursday, December 6, 2012

Peanut Butter Blossoms

I have been debating getting a stand mixer for years.  Typically, I borrow my mom's if I have to do a serious bout of baking.  For anything else for which a stand mixer would come in handy, I just make due by some other means (like hand-mashing potatoes, which doesn't happen often).  When a stand mixer showed up on my doorstep a week ago as an early Christmas present from my husband, the first thing I made were these cookies - his favorite.  I used a recipe out of my recipe box from my mom.  I had to smile when I noticed it was the exact recipe from the back of the bag of Hershey Kisses.  (Incidentally, my kids loved to help - I shaped the dough into balls, they rolled the balls in the sugar and put them on the cookie sheet.)

INGREDIENTS:
  • 48 Hershey Kisses
  • 1/2 c shortening
  • 3/4 c peanut butter
  • 1/3 c sugar
  • 1/3 c packed brown sugar
  • 1 egg
  • 2 Tbsp milk
  • 1 tsp vanilla
  • 1 1/2 c flour
  • 1 tsp baking soda
  • 1/2 tsp salt
DIRECTIONS:
  1. Preheat oven to 375.
  2. Beat shortening and peanut butter in a large bowl until blended. 
  3. Add 1/3 cup sugar and 1/3 cup brown sugar; beat until fluffy.
  4. Add egg, milk, and vanilla; beat well.
  5. Stir together flour, baking soda and salt; gradually beat into peanut butter mixture.
  6. Shape dough into 1 inch balls.  Roll in granulated sugar; place on ungreased cookie sheet.
  7. Bake 8-10 minutes or until lightly browned.  
  8. Immediately press a chocolate piece into center of each cookie.  Cookie will crack around edges.  Cool on wire rack.  Makes 4 dozen cookies.

Difficulty: I think these are relatively easy as far as cookies go, but I have made easier
Time: 10 minutes prep; 8-10 minutes baking per batch
Source: my mom (or the back of the bag of Hershey Kisses)


Sunday, December 2, 2012

Kelly's Menu Plan 12/3 thru 12/9


The Christmas season is full of activities for my family-trips to outdoor ice skating rinks, cookie parties, gingerbread house making, parties.  This weekend we were stuck at home; everyone had the flu.  I used some of my extra downtime working on a menu.  I am hoping doing some meal planning will keep me out of the crowded grocery stores while letting me spend the rest of this special time with my kids.

Monday-Sausage, Spinach, and Tomato Pasta
I bought spinach on sale earlier this week, and we have some frozen sausage. This recipe is one of my husband's favorites.

Tuesday-Turkey Day Casserole
John asked that I would add this dish to the rotation, and Andrew, my 16 month old son, loves it.  I took advantage of all the sale prices on canned cranberries and stuffing.  The coupon on the Country Crock side dishes will be useful to pick up the mashed potatoes.

Wednesday-Leftovers
When I get home from work, John will be handing me 2 dance bags, two ready dancers, and a bag of dinner for us.  
Thursday-Zesty Chicken Pasta
We haven't had this dish in a few months.  The kids don't like it so spicy, so I'll reserve some pasta for them.

Friday-Pizza
Lately, I've been having my husband stop at Aldi to pick up their take-and-bake pizza on his way home.

Saturday-Pulled Barbecue Chicken Crescents 
I've been seeing lots of holiday coupons for crescent rolls lately, time to stock up.  I'll use the rest of the chicken I defrosted for Thursday's dinner to make this.  

Sunday-Snickers Cookies and Apple Crescent Surprise
We'll be having dinner with my family so I will need to bring a dessert, the apple crescents. We are working on our Christmas cookies. I did have to break down and buy the snickers this year; we didn't have a lot of leftover Halloween candy, and I wasn't fast enough to collect the snickers bars and hide them.

Thursday, November 29, 2012

Orange Spiced French Toast


As my own family grows, we are making a tradition of  holiday breakfasts.  No one wants to cook on Christmas morning so I have found organizing a delicious meal and just throwing it in the oven works for us (much better than eating leftover cookies).

I loved the recipe found in Gooseberry Patch's The Christmas Table for Orange Spiced French Toast.  At first glance, I was a bit disappointed with having to transfer the bread after soaking onto a jelly roll pan.  My disappointment disappeared with the first bite!  Baking the French toast on the pan really gives it a great crisp finish, nothing soggy about this French toast.  My family loved it!  The accompanying syrup was great too!

INGREDIENTS:

French Toast

  • 1 loaf French bread, sliced
  • 4 eggs
  • 2/3 cup orange juice
  • 1/3 cup milk
  • 1/4 cup sugar
  • 1 t vanilla extract
  • 1/4 t ground cinnamon
  • 1/8 t nutmeg
  • 1/4 cup butter, melted
Orange Syrup
  • 1/2 cup butter
  • 1/2 cup sugar
  • 1/3 cup frozen orange juice concentrate
  • 1/2 cup chopped pecans

DIRECTIONS:

Orange Spiced French Toast
  1. Arrange bread in a single layer in an ungreased 13 x 9 baking pan.  
  2. In a bowl with an electric mixer on low speed, beat remaining ingredients except butter.
  3. Pour egg mixture over bread, turning slices to coat both sides. Cover and refrigerate 2 to 24 hours.
  4. Spread melted butter in a 15 x 10 jelly roll pan (I used a large lipped cookie tray). Arrange bread slices in a single layer on top of butter.  Bake uncovered at 400 degrees Farenheit for 20 to 25 minutes until lightly golden, turning slices once halfway.  
Orange Syrup
  1. In a saucepan over low heat, combine butter, sugar, and orange juice concentrate.
  2. Stir until butter is melted; do not boil.
  3. Cool for 10 minutes; beat with an electric mixer on low speed until thickened.  Stir in pecans.


Difficulty: Medium
Time: Prep time is 20 minutes, plus overnight; baking time is 25 minutes
Source: Gooseberry Patch's The Christmas Table, Copyright 2012

We are sorry, but the giveaway for this post is over.  Congrats to our winner!

a Rafflecopter giveaway

Sunday, November 25, 2012

Barbecups


Kelly:  Joyce and I have enjoyed Gooseberry Patch cookbooks for quite a while; In fact, I got her one for Christmas last year.  We have found some excellent easy crock pot meals like Pepper Steak.  Now, we are proud to have the opportunity to review and give away a copy of their newest book, The Christmas Table.

As I am planning my first old-fashioned family Christmas for twenty relatives, this book arrived at the perfect time.  The Christmas Table is filled with delicious recipes for the holiday season as well as ideas for adding tradition to your family get-togethers. I loved some of the time saving suggestions. (I almost always forget to soften butter; Gooseberry Patch recommends using a cheese grater on the cold butter and letting it soften in a few minutes.)  I plan on incorporating some of their sweet memory ideas like making all my guests give a Christmas wish and providing ornament place cards.  Some of my early favorites from the plethora of recipes - the Cozy Christmas Brunch chapter's "Orange Spiced French Toast", Chill-Chasing Soup's "Southwest Butternut Squash Soup", and Caroling Party Supper's "Barbecups".

Joyce: There were so many delicious sounding options in this cookbook that it was hard to decide what to make for this review.  At first, I had a hard time taking my eyes off of the "Sweet Treats to Share" chapter, but when I saw this recipe, I just knew that it would be a hit with my family.  Basically, if it is in the shape of a cupcake, my kids love it.  I couldn't wait to try these Barbecups, and they did not disappoint.  My three-year-old said, "Yummy in my tummy!"  and the rest of us felt the same.  These will definitely be entered into the regular rotation; besides being delicious, they are also so quick and easy!  I am looking forward to making many more recipes from The Christmas Table.

INGREDIENTS:
  • 1 lb ground beef
  • 1/4 cup onion, chopped
  • 1/2 cup barbecue sauce
  • 1 Tbsp brown sugar, packed
  • 12 oz tube refrigerated biscuits
  • 1/2 c shredded cheddar cheese
DIRECTIONS:
  1. Grease 10 muffin cups. Preheat oven to 400 degrees.
  2. In a skillet over medium heat, brown beef with onion; drain.  Stir in barbecue sauce and sugar; cook one minute.
  3. Separate biscuits; firmly press one into the bottom and up the sides of each muffin cup.  Spoon 1/4 cup beef mixture into each biscuit; sprinkle with cheese.
  4. Bake for 10 to 12 minutes until biscuits are golden.  Cool; remove from tin.  Makes 10.

Difficulty: Very easy
Time: 10-15 minutes hands on time, 10-12 minutes in the oven
Source: Gooseberry Patch's The Christmas Table, copyright 2012

We are sorry, but the giveaway for this post is over.  Congrats to our winner!

a Rafflecopter giveaway


Monday, November 19, 2012

Mashed Sweet Potatoes and Apples

My mother-in-law made these for Christmas Eve last year, and my son made sure we got to keep all of the leftovers.  He asked for them every day until they were gone.  They were SO good!  They are sure to be a hit for Thanksgiving when I bring them to my parent's house this year, and I even plan to make them when my son gets his tonsils out in a few weeks - they are a great, healthy, soft food that he will be able to eat and that the rest of the family will enjoy as well.

INGREDIENTS:
  • 4 lg sweet potatoes (3 1/2 to 4 lb) - I use yams when they are cheaper and it is just as good (note: yams are actually sweeter; though they are not as calorie dense, they don't provide as many vitamins and minerals as sweet potatoes)
  • 1/2 cup butter or margarine, softened
  • 3 medium apples, peeled, chopped (about 4 cups)
  • 2 tsp ground cinnamon or pumpkin pie spice
  • 1 tsp sugar
  • 1/2 tsp salt
  • 1/4 tsp pepper
DIRECTIONS:
  1. Preheat oven to 375 degrees Fahrenheit. Line cookie sheet with foil.  Pierce sweet potatoes with fork; place on cookie sheet.  Bake 1 hr to 1 hr 15 min or until tender when pierced with a fork.  Let stand 15 minutes or until cool enough to handle.
  2. Meanwhile, in 10 inch nonstick skillet, melt 2 tablespoons of the butter over medium heat.  Cook apples, cinnamon and sugar in butter 5 to 7 minutes, stirring frequently, until apples are tender.
  3. Spray 13 x 9 inch glass baking dish with cooking spray.  Slip off sweet potato skins; place potatoes in large bowl.  Add salt, pepper, and remaining 6 tablespoons butter; mash until no lumps remain.  Add apple mixture; mix well.  Spread in baking dish.
  4. Cover with foil; bake 25 to 30 minutes or until center is hot. 

Difficulty: pretty easy, though there is a bit of chopping and mashing (the mashing takes less than 30 seconds, though, if the potatoes are done enough)
Time: total of 1 hour and 45 minutes to 2 hours from start to finish, much of which is hands-off
Source: I believe that my mother-in-law got this recipe from a Weight Watchers cookbook

Monday, November 12, 2012

Libby's Pumpkin Roll


One of our favorite desserts has always been pumpkin rolls.  I would always find some organization fundraising and buy one.  There was no way I was tackling making my own; it seemed complicated.  I also don't own a jelly roll pan or sifter (I know you are gasping).

A few years ago, my friend Jennifer suggested we make our pumpkin rolls together.  She bakes a lot and has a fully stocked kitchen; Jenn can even produce a 2/3 measuring cup. We didn't even bother looking for recipes; we cut the label off the can of Libby's Pure Pumpkin and followed the instructions.  It is much less difficult when you have someone to measure while you mix or prep the pans.  The whole rolling the cake was new to both of us, but it gets much easier with practice.  Jenn and I love getting together to bake, plus, we plan our Black Friday shopping extravaganza. We make the rolls in early November and freeze them; they hold up wonderfully.   

INGREDIENTS:

Cake
  • 3/4 cup flour
  • 1/2 t baking powder
  • 1/2 t baking soda
  • 1/2 t ground cinnamon
  • 1/2 t ground cloves
  • 1/4 t salt
  • 3 large eggs
  • 1 cup sugar
  • 2/3 cup Libby's Pure Pumpkin
Filling
  • 1 package (8 oz) cream cheese, softened
  • 1 cup sifted powdered sugar
  • 6 T butter, softened
  • 1 t vanilla extract
DIRECTIONS:
  1. Preheat oven to 375 degrees Fahrenheit. Grease a 15 x 10 inch jelly roll pan; line with wax paper (I suggest allowing about 1/2 inch paper extra to help lift the cake and tear the paper off).  Grease and flour the paper liberally.  Sprinkle a thin, cotton kitchen towel with powdered sugar.
  2. Combine flour, baking powder, baking soda, cinnamon, cloves, and salt in a small bowl.
  3. Beat eggs and sugar in large mixer bowl until thick.  Beat in pumpkin.  Stir in flour mixture.  Spread evenly into prepared pan.  
  4. Bake for 13-15 minutes or until top of cake springs back when touched.  Immediatly loosen and turn cake onto prepared towel.  Carefully peel off paper.  Roll up cake and towel together starting with narrow end. Cool on wire rack.
  5. For filling, beat cream cheese, powdered sugar, butter, and vanilla in a small mixer bowl until smooth. Carefully, unroll cake; remove towel.  Spread cream cheese mixture over cake.  Reroll cake.  Wrap in plastic wrap and refrigerated at least 1 hour.  Sprinkle with powdered sugar before serving if desired.
Sorry for not having a picture...my pumpkin rolls are tightly covered in plastic wrap and aluminum foil in the freezer.

Difficulty: Medium
Time: 20 minutes prep time, 15 minutes baking time, cooling time varies
Source: Libby's Pure Pumpkin recipe found inside

Wednesday, November 7, 2012

Turkey Day Casserole

During my first pregnancy, I fell in love with The Food Network.  While on bed rest, I watched episode after episode.  Semi Homemade with Sandra Lee stood out to me as food I might be able to make.  She had tons of shortcuts for busy people.  My dad and I take turns talking up her recipes.  Recently, he found a new discount store near his home; they had an entire section of Sandra Lee stuff.  He bought me two new cookbooks.

I chose to try this recipe because many of the ingredients are on sale as Thanksgiving approaches.  My favorite local grocery store had a special on ground turkey for $1 a pound.  This was super easy to put together and tasted wonderful.  I plan to make it with my Thanksgiving leftovers in a few weeks, substituting turkey leftovers and homemade mashed potatoes. I can't wait!

INGREDIENTS:
  • 1 container (24 oz) mashed potatoes
  • 1 pound uncooked ground turkey
  • 1 box stuffing for turkey
  • 1 can (16 oz) whole cranberry sauce
  • 2 jars home-style turkey gravy
  • 2 T butter, cut into small pieces

DIRECTIONS:
  1. Preheat oven to 350 degrees Fahrenheit   Microwave mashed potatoes, uncovered in container on high for 1 minute.  Stir to break up potatoes.
  2. In a medium pan, brown ground turkey; drain.
  3. Spread dry stuffing mix in the bottom of a casserole dish.  Top with cranberry sauce.  Layer turkey and 1 jar of gravy.  Spread mashed potatoes over layers in dish.  Dot with butter pieces.
  4. Bake in oven for 30 to 40 minutes
  5. Serve; heat remaining gravy (I suggest trying the dish before opening the second jar; we didn't need one).  Serve with casserole.
This version is made from leftovers, so the turkey is not ground.  Not a totally photogenic meal, but delicious!

Difficulty: Easy
Time: 15 minute prep; 40 minutes baking time
Source: Sandra Lee Semi-Homemade Slow Cooker Recipes

Sunday, November 4, 2012

Joyce's Menu Plan 11/4 - 11/9

The upcoming weeks are the busiest of the year for me.  As assistant director for our fall play, which opens on November 13th, I will be spending a great number of hours at rehearsal in the evenings after work and on Saturdays.  I am already feeling the effects of not planning well this past week.  Fortunately, we had leftovers two nights, but we did end up eating hot dogs one night and pizza another - definitely not one of our better weeks.  So, I am determined to make a meal plan this week and get to the grocery store ASAP.

Sunday - Chicken Divan
It has been a while since I made this delicious casserole.  It always serves me well when I need leftovers later in the week.  Plus, it has broccoli in it and my kids still love it.
Monday - Sausage, Tomato, and Spinach pasta
This is one of my family's all-time favorites.  I love how easy it is and how quickly it comes together; it literally takes the time to boil water and cook pasta.  And with such healthy ingredients (and so few of them), it is definitely a winner.
Tuesday - Hearty Taco Stew
You can't go wrong with a slow cooker meal that is guaranteed to have leftovers.  I will serve this with cornbread and salad.
Wednesday - Leftover Chicken Divan
It will just be me and the kids for dinner this night, so the leftover chicken divan should be plenty for the three of us.
Thursday - Leftover Hearty Taco Stew
As I said, this needs to be a low-maintenance, quick prep kind of week.  I am maximizing the leftovers.
Friday - Zesty Pork Chops
It is time for me to use the pork chops in my freezer and the apple left in my fruit bowl!  This is a tasty recipe that brings a little variety to the table. 

Monday, October 29, 2012

Slow Cooker Tex-Mex Chicken

While I continue to search for and try new slow cooker recipes, I often find myself falling back on my old favorites.  This is a delicious "oldie but goodie" that I have made for years.  With a little prep the night before, it is a simple meal to throw together in the morning before work.


INGREDIENTS:
  • 1 1/2 lb boneless skinless chicken breasts, cubed
  • 1 package taco seasoning mix (or 3-4 Tbsp if you use a container instead of the packets)
  • 2 Tbsp flour
  • 1 each green and red pepper, coarsely chopped (1/2 inch - 1 inch pieces)
  • 2 cups frozen corn
  • 1 (15 oz) jar of chunky salsa
  • Mexican style or cheddar shredded cheese to top
DIRECTIONS:
  1. Toss chicken with seasoning mix and flour in slow cooker.  Stir in all remaining ingredients except the cheese; cover.
  2. Cook on LOW for 6-8 hours or (or HIGH 3-4 hours).  Stir just before serving.  Serve over rice or quinoa; top with shredded cheese.


Difficulty: Easy
Time: 10-15 minutes prep, 3-8 hours cooking time (depending on setting)
Source: Adapted from a recipe found in Kraft Food & Family magazine, Fall 2007

Monday, October 22, 2012

Mexican Casserole

I love making casseroles! This one is quick and easy. Plus, you can use leftovers to make it; I make this the same week I prepare taco cupcakes so that I brown the ground meat, black beans, and taco seasonings and reserve half. If you don't want to have two Mexican dishes in the same week, go ahead and freeze the meat mixture.

  INGREDIENTS:
  • 1 pound ground beef
  • 1 cup black beans
  • 1 package taco seasoning and 2/3 cup water per directions
  • 15 ounces of refried beans
  • 2 cups shredded Mexican cheese (I also use Colby Jack if that is what I have)
  • 1 cup salsa (I finish off the jar from the taco cupcakes)
  • 1 can sliced black olives (drained)
  • 1 tomato (chopped)
  • 2 cups crushed corn chips
  • 1 green onion (chopped)
DIRECTIONS:
  1. Preheat oven to 375 degrees Fahrenheit.
  2. Brown and drain meat. Add black beans. Add seasoning; following the package directions. Set aside.
  3. Heat refried beans in saucepan. Add salsa and 1 cup of cheese. Stir.
  4. Place crushed corn chips on bottom of 8x8 dish. Spread bean mixture. Add meat.
  5. Sprinkle remaining cheese, green onion and black olives.
  6. Bake until heated and cheese is melted.
  7. Sprinkle with chopped tomatoes (if you don't have fresh tomatoes, I have used canned with green chilies, drained).
Difficulty: Easy
Time: 10 minute prep; about 15 minutes baking time

Monday, October 15, 2012

Stuffed Pepper Skillet

I loved stuffed peppers as I was growing up. Mostly, I liked the filling, but as I got older, I came to love the peppers just as much. My first attempt to make them came before I was married; when my future husband took the first bite and I heard a crunch, I knew something had gone terribly wrong.  To date, that was the worst meal I have ever made and I still give him credit for attempting to eat it.  Needless to say, I have been a bit gun-shy about making stuffed peppers since, though.  I have had great success with Kelly's Southwestern Stuffed Peppers, but when I saw this one-skillet recipe, I knew I had to try it.  As I hoped, it is delicious and easy, and has quickly become a family favorite.

INGREDIENTS:
  • 1 lb ground beef
  • 1 can (14.5 oz) diced tomatoes, undrained
  • 1 can (8 oz) tomato sauce
  • 1 large green pepper (or two!) chopped or cut into slices
  • 1 medium onion, thinly sliced
  • 2 cups water
  • 1 1/2 tsp salt
  • 1/2 tsp pepper
  • 1/2 tsp Italian Seasoning
  • 1 1/2 cups instant rice (uncooked)
DIRECTIONS:
  1. Brown meat in a large skillet until no longer pink; drain.  Remove from pan and set aside.
  2. In the same skillet, add peppers and onions and saute for 2-3 minutes.  
  3. Add the diced tomatoes, tomato sauce, seasonings, and water; bring to a boil.
  4. Reduce heat and simmer (uncovered) until veggies are done to desired tenderness, stirring occasionally.  
  5. Stir in rice.  Remove from heat, cover, and let stand for 5 minutes.
  6. Stir in beef.  Return to heat for a couple of minutes until heated through.


Difficulty: Easy
Time: about 25 minutes
Source: adapted from www.tasteofhome.com

Thursday, October 11, 2012

Kelly's Menu Plan 10/13 thru 10/20


I am overwhelmed with the number of things I need to do in a day.  Honestly, I would drop at 8 PM each night if I could.  Meal planning is helping me to keep on top of grocery shopping, dinners, and lunches for work.  Just like in school, there is a calmness because everything is ready to go; if I over plan,  I am just all the more prepared for the next day.


Saturday-Potato Soup
I am enjoying the fall weather with my kids-leaves, pumpkins, parades, costumes.  After being outside most of the morning and early afternoon, potato soup will warm our chilly bodies. An added bonus is that this is a crock pot meal.  
Sunday-Pumpkin Dump Cake
This is hands down my favorite fall dessert recipe.  I've been looking at the pumpkin pies in Costco for weeks now...it is time to start some holiday baking.  Now, I must find a way to get the picture before the family dives in.
Monday-Creamy Cauliflower Mac
 I could hardly contain my excitement when Farmer Boy at the CSA handed me a giant cauliflower.  This is one of the best, most unexpectedly good recipes I have ever found.  
Tuesday-Delicious Crock Pot Pork Chops
I have some pork chops from a recent BOGO sale.  They've been in the deep freeze for two or three weeks.  I plan on pairing this with roasted squash.
Wednesday-Dinner on the Run
We will be eating in our car Wednesday since both girls have dance class.  Both girls' new favorite is a mini bagel with ham, cheese, and lettuce.  That is what I will pack.  I will have to put sticky notes everywhere so I remember to bring the dinner into work to keep cold AND take it with me on the way to pick them up.
Thursday-Taco Cupcakes
I have some extra won-tons and ground meat in the freezer; plus, my husband picked up some queso dip at Aldi.  I have almost everything I need to make this crowd pleaser.  I don't worry too much about slicing tomatoes for toppings; I just add salsa with more fresh tomatoes.  Sometimes time is more valuable.  The kids will gobble this up with a side of corn.
Friday-PIZZA
I found that when I stop home to pick up my daughter from the neighbors and take care of the dog there is just enough time to call Pizza Hut.  By the time I pick up the other two children, all I have to do is cross the street and go through the pick-up window.  It may not be the most healthy option, or the most affordable, but it is the most convenient. 
.


Monday, October 8, 2012

Apple Crisp

There isn't much that can beat the smell of an apple crisp baking on a cool fall day... except maybe the taste of that apple crisp when it is still warm from the oven.  I always look forward to this time of the year when apples go on sale and the days get cool enough for me to want to heat the oven to make this delicious recipe.  I have made it for years and most recently made it to take to dinner at a friend's house.  It was a hit, as it always has been.  My kids helped me make it this time but didn't get the opportunity to eat it, so I plan to make another with them very soon.  We love all kinds of apples (as well as their health benefits)! If you want to learn about what the differences are between types of apples and their amazing science-backed heath benefits, here is a great article: http://www.well-beingsecrets.com/apples-health-benefits/

(You will need more apples than I have in this picture.)
INGREDIENTS:
  • 1/2 c old fashioned or quick-cooking oats
  • 3 graham crackers, finely crushed
  • 1/3 c plus 1/2 cup firmly packed brown sugar
  • 1/3 c plus 2 Tbsp flour
  • 1/4 c walnut pieces
  • 1/3 c butter or margarine, melted
  • 1 tsp cinnamon, divided
  • 6 c apples (~5 med), sliced
DIRECTIONS: 
  1. Preheat oven to 375 degrees F.  In a medium bowl, mix oats, graham cracker crumbs, 1/3 cup of flour, 1/3 cup brown sugar, walnuts, butter, and 1/2 tsp of cinnamon until well blended.  Set aside.
  2. In a large bowl, mix 1/2 cup of brown sugar, 2 Tbsp flour, and remaining 1/2 tsp of cinnamon.  Add sliced apples and toss to coat.
  3. Place apples in an 8 inch square baking dish; sprinkle with oat topping.  Bake 35-40 minutes until apples are tender.

Difficulty: relatively easy, but a decent amount of measuring plus the slicing of the apples
Time: ~15 minutes prep, 35-40 minutes baking
Source: Kraftfoods.com

Monday, October 1, 2012

Zucchini Bread with Pineapple

Zucchini is something that seems to grow extremely well in our part of the country. People are always giving me fresh zucchini from their gardens. My CSA produce contains zucchini almost every week so I've tried lots of recipes.  Now that the weather is cooling off, I am ready to start turning up the oven for baking. This recipe is from one of the best bakers I've ever met; she often brings warm baked treats into work in the morning.  I have yet to be able to bring one of these loaves of bread to work warm, but everyone enjoys them anyway.


INGREDIENTS:
  • 2 grated zucchini (I peel and throw them in my mini-chopper)
  • 8 oz of crushed pineapple (drained)
  • 3/4 cup oil
  • 2 t vanilla
  • 3 cups flour
  • 1 t baking powder
  • 1 t cinnamon
  • 1 cup nuts (I use chopped walnuts)
  • 2 cups sugar
  • 3 eggs
  • 1/2 t salt
  • 1 t baking soda
  • 1 t nutmeg
  • 1 cup chocolate morsels (this is my addition to Susan's recipe)
DIRECTIONS:
  1. Preheat oven to 350 degrees Fahrenheit.
  2. Mix oil, sugar, vanilla; beat well.
  3. Add eggs; beat.
  4. Add grated zucchini and pineapple; mix.
  5. Add dry ingredients and mix until blended.
  6. Pour into 2 loaf pans (sprayed with cooking spray and floured)
  7. Bake at 350 degrees F for 1 hour.
  8. Test with a toothpick; cool 10 minutes.
  9. Turn out onto wire rack.

Difficulty: Medium
Time: 30 minute prep; 1 hour baking time
Source: my coworker Susan

Wednesday, September 26, 2012

Joyce's Menu Plan 9/22 - 9/28


Kelly and I both wrote menu plans for this week, but I am a bit late in publishing mine.  I am already through much of it, and can tell you that it is working out really well.  We have enjoyed a nice variety so far this week, and have had some very yummy lunches to take to work.  My colleagues are some of this website's biggest fans...when I sit down to my reheated leftovers, I often hear, "That looks awesome! Is that on your website?"  Yep!  And it sure beats a school lunch or cold cut sandwich!

Sunday - Southwestern Stuffed Peppers
Years ago, I tried my hand at a recipe for traditional stuffed peppers and it was a disaster.  Something went wrong with the rice, and the filling turned out to be crunchy.  I have always been hesitant to make stuffed peppers since, but this recipe is fantastic.  I use the quinoa, as Kelly recommends.  
Monday - Parmesan Crusted Chicken
You just can't beat this easy meal.  My kids gobble it up every time.  My motivation for making it this week is that I have a bunch of fresh grated Romano cheese that I want to use.  The recipe calls for Parmesan, but this will give it a slightly different twist and use up my ingredients so they don't go to waste.
Tuesday - Bratwurst, potato pancakes, veggies
I drive past ALDI's on my way home from work and occasionally make the time to make a quick stop before picking my kids up from school.  This week, they have their Oktoberfest foods on sale, so I grabbed some for an easy meal after gymnastics.
Wednesday - Pork and Apple Skillet Meal
Time for one of my family's favorite fall meals.  I have apples in the fridge, mushrooms are on sale, and I just bought onions last week.  Looking forward to this one!
Thursday - Pizza
The kids and my husband have Taekwondo; I have Open House to attend.  This day must have a meal that is quick to prepare (buy!) and quick to eat.  
Friday - Pasta and Sauce with tossed salad.
The last time I made Homemade Spaghetti Sauce, I froze three bags of it.  I will take a bag out of the freezer on Thursday and it should be thawed by dinner on Friday.  Since the meat is already in it, this meal will be a snap to make.

Monday, September 24, 2012

Mini Salmon Loaves

This recipe started with a can of salmon my dad gave me AWHILE ago.  Every time I would go to donate the can to a food drive, I'd think, "This is salmon; it is healthy; surely, I can use this."  As I was flipping through an edition of Runner's World, I found a salmon loaf recipe.  It seemed easy, healthy, and good.  Then, I lost the recipe...of course.  I searched for "salmon" on Runner's World, and found this recipe.  I added both sesame seeds and ground flaxseed for the nutritional benefits.


INGREDIENTS:
  • one can (14.5 oz) of wild salmon, drained
  • 1 box frozen, chopped spinach, thawed
  • 1 red bell pepper, diced
  • 2 teaspoons of dried dill 
  • juice for 1/2 lemon
  • 1/2 cup quick cook rolled oats
  • 2 large eggs
  • salt and pepper
  • 2 t sesame seeds
  • 2 T ground flaxseed
  • salsa (as a topping if desired)
DIRECTIONS:
  1. Preheat oven to 375 degrees Fahrenheit.
  2. Lightly spray a 12-yield muffin tin with cooking spray.
  3. Combine all ingredients in a large bowl and mix well.  Add salt and pepper to taste.
  4. Divide among the muffin cups.  Bake for 20 minutes.  
  5. Let cool before removing from pan.  Serve topped with salsa.


Difficulty: Easy
Time: 10 minute prep, 20 minute baking time

Source:  adapted from Runner's World using Rodale recipe finder

Wednesday, September 19, 2012

Dijon Chicken Thighs with Artichoke Sauce (Slow Cooker)

As a huge fan of artichokes and (obviously) a huge fan of the slow cooker, I first tried this meal a few years ago when my kids were about eighteen months and three and a half years old.  In the margin of the page of the cookbook, I wrote "Very good!! Kids liked it, too!!"  I have since made it several times each fall and winter, in the hopes that my kids will continue to like artichokes and because it is such a great, tasty, easy fall meal.  This latest time, I decided to make it because chicken thighs were only $0.79 per pound and mushrooms were $1 per pack.  Can't beat cheap, easy, and delicious!

INGREDIENTS:
  • 1/3 cup Dijon mustard
  • 2 Tbsp chopped garlic
  • 1/2 teaspoon dried tarragon (honestly, the original recipe calls for this but I couldn't find it at the store when I went, so I have never used it)
  • 2 1/2 lbs chicken thighs (about 8), skinned
  • 1 sm onion, chopped
  • 1 8 oz pkg of sliced mushrooms
  • 1 jar (12 oz) quartered marinated artichoke hearts, undrained
  • 1/4 cup chopped fresh parsley (optional)
DIRECTIONS:
  1. Combine mustard, garlic and tarragon (if using) in large bowl.  Add chicken thighs and toss to coat.  Transfer to slow cooker. (I generally just mix all of this in the bottom of the slow cooker.)
  2. Add onion, mushrooms, and artichokes with liquid.  Cover; cook on LOW 6-8 hours or on HIGH 4 hours or until chicken is tender.  Stir in parsley (if using) just before serving.  (I program mine to cook for 7 hours and then it stays on warm for a couple more before I get home.)

Difficulty: easy
Time: 10 minutes prep, 4-8 hours cooking (depending on slow cooker setting)
Source:  Crock-Pot Cookbook (copyright 2008)

Monday, September 17, 2012

Kelly's Menu Plan 9/22 - 9/28


My last menu plan lasted two weeks; then a week of heating up frozen stuff or eating leftovers followed.  Now it is time to try again.  I think this is a pretty ambitious plan...we'll see what happens.  Grocery shopping tomorrow (ON MY OWN!) Going to the store by myself has become one of my treasured opportunities.


Saturday-Breakfast Casserole
I love this meal.  It is so easy to prepare the night before and just heat up the next morning.  I am expecting some fresh hot peppers in my CSA pickup so I will throw them in to help jump start the day.
Sunday-Eclair Dessert
My brother has been nagging me to make the dirt dessert, but I think he'll like this instead.  I really don't want to spend time crushing Oreos. Last time I made this I used banana pudding and vanilla pudding (it seems the boxes are the same color; when you are trying to get out of the store before a melt down, mistakes happen).  This time, I may try chocolate graham crackers.
Monday-Salsa Chicken
My older daughter starts CCD this Monday so I am not quite sure how it will all play out for dinner, but this is a winner every time in our house. 
Tuesday-Chicken and Spinach Rigatoni
I really like this affordable dinner.  My kids love pasta, and I love getting them to eat spinach.  Just hoping my husband packs up the leftovers this time; our dog feasted on them a few weeks ago.
Wednesday-Dinner on the Run
We will be eating in our car Wednesday since both girls have dance class.  I sampled a tortilla spread with hummus and sliced turkey at Costco this week; it was so good.  I plan to hide a bit of hummus under tons of lettuce for the girls.
Thursday- Pulled Pork
 One of my coworkers was making it this week; she was planning to top it with coleslaw.  I wished I could go home with her!  I may try her toppings, but I know we'll have sweet potato fries, and corn.
Friday-PIZZA
My husband will have a late work commitment so the kids and I are planning on Pizza, Popcorn and Princess and the Popstar .
.


Sunday, September 9, 2012

Homemade Spaghetti Sauce

There was a point in time, not long ago, when I would have said, "Who in the world would make his or her own sauce when there is perfectly good stuff you can buy off the shelf for $2?! Seriously, spaghetti night is supposed to be the quickest and easiest meal of the week!"  I am not saying that I will never again buy sauce, but I definitely became a sauce convert about six months ago.  My friends who have long made their own sauces are wondering what took me so long.  I am, too.  This sauce is SO much better than jarred and it honestly doesn't take that much work or time.  This batch makes enough for at least three meals; I freeze two portions.  I add the meat from the start, so when I use it, I don't even have to brown meat.  Taking a bag of sauce out of the freezer the night before spaghetti night actually saves me time.  Plus, I love the feeling that I get when making it with my own fresh herbs and that I can control the amount of sugar and salt that goes in.  (The amount of sugar in jarred sauce is astounding!)  If you have never made sauce yourself, please give this a try one afternoon.  You won't regret it!


INGREDIENTS:
  • 2.5-3 lb meat (I use a combination of ground beef and sausage)
  • 2 medium onions, diced
  • 2 (29 oz) cans of tomato sauce
  • 1 (29 oz) can of diced tomatoes
  • 1/4 cup fresh basil, chopped (use less if using dried)
  • 1/4 cup fresh oregano, chopped (use less if using dried)
  • 4 cloves garlic, diced
  • 3 Tbsp sugar
  • 2 bay leaves
  • 2 tsp salt
  • 1/2 tsp pepper
DIRECTIONS:
  1. Brown ground meat with onion in a large pot or dutch oven until no longer pink.
  2. Add remaining ingredients; bring to a boil.  Reduce heat and simmer for at least 1 hour, stirring occasionally.

Difficulty: Surprisingly easy
Time: about 1.5 hours, 20 minutes or so of which are hands-on
Source:  After researching online for a while, I just decided to make my own recipe; I have made this many times now and my family devours it!