Showing posts with label chocolate. Show all posts

Friday, June 16, 2017

Thin Mint Smoothie

You know those subscriptions services that you can subscribe to where you pay a fee and then you get a box filled with goodies (like clothes or pet supplies or beauty items) delivered to your door? They are all over the place these days.  You can even order a "man box" to be delivered to a favorite man in your life.  There is something exciting about getting that box filled with who-knows-what that someone else put together for you.  That is exactly what getting my CSA is like for me!  I get a bag filled with the best fruits and veggies around, along with recipes to try.  This week was my first pick-up and I was thrilled!

One of the reasons I like the CSA is also one of the reasons I liked the clothing box service that I tried once - it pushed me out of my comfort zone.  I would not have bought that sweater, but I loved it once I had it on!  Likewise, I would not have bought mint or scapes this week, but goodness gracious am I glad they were in my CSA.  This shake that I made with the mint is incredible...just what I needed on a hot summer day.  My daughter had a friend over and when I shared with the three kids, she told me I should give her mom the recipe. (I didn't bother telling her how healthy it is.) Win!!

(P.S. Don't know what a CSA is? Here is a link to try: What is a CSA?)

INGREDIENTS:
  • 1.5 oz spinach
  • 1 banana
  • 1 apple
  • 3-5 sprigs fresh mint - stemmed
  • 1 tbsp cacao powder
  • 1 tsp cacao nibs (I couldn't find any at my grocery store, so I used dark chocolate chips)
  • 1 cup water
  • 1 cup ice

DIRECTIONS:
Blend all ingredients except for the cacao nibs for 1-3 minutes.  Add the cacao nibs and blend for 30 seconds more.


Difficulty: easy
Time: 4 minutes
Source: https://greenblender.com/smoothies/recipes/thin-mint


Wednesday, August 31, 2016

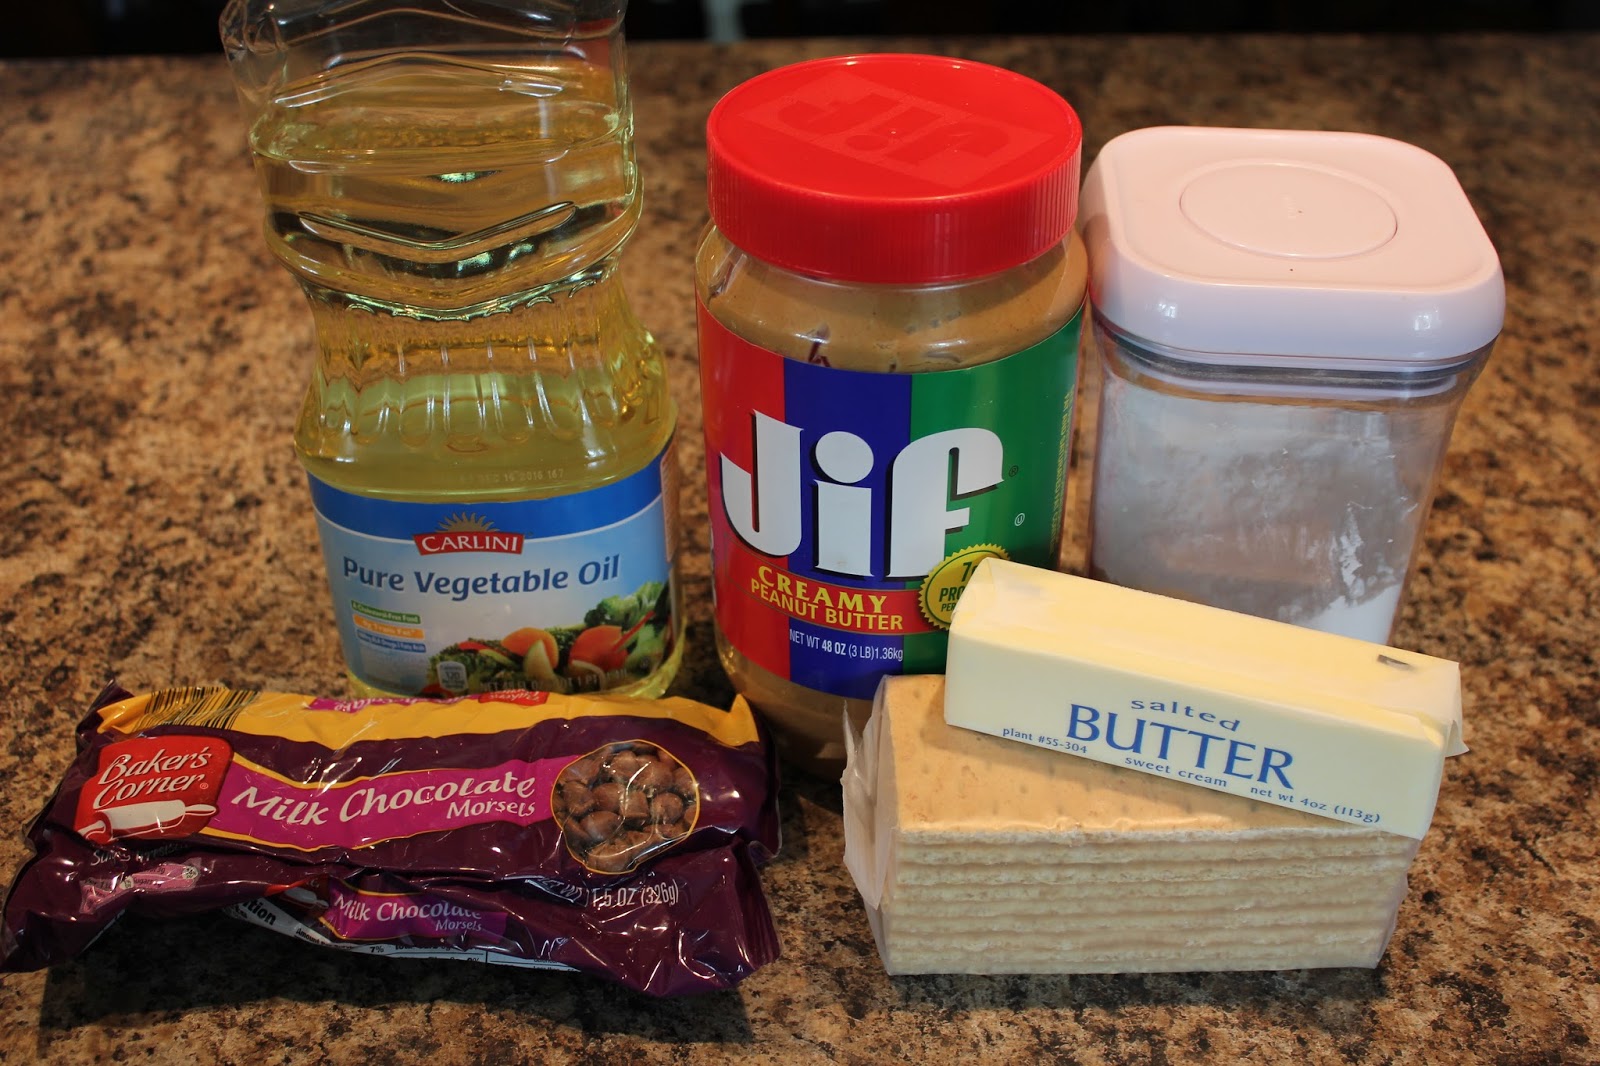
No Bake Chocolate Peanut Butter Bars

I am both happy and dismayed to have found this recipe early this summer. Happy because it was a huge hit at every get together that I took it to; Dismayed because I had NO self-control when it came to eating it. I am a person that posted on Facebook years ago that there should be Reece's Peanut Butter Cup flavored gum. I would buy it by the case. This recipe has just the right combo of ingredients to strip away all of my will power.  Don't let that discourage you, though.  You DEFINITELY want to make this for your next get together.  (Just make sure you have some people to share it with.)

INGREDIENTS:
  • 1 stick butter
  • 1 cup peanut butter, smooth
  • 2 cups (about 1 pack or 9 grahams) graham crackers, broken/crushed
  • 1 cup powdered sugar
  • 2 cups chocolate chips plus 2 tbsp vegetable oil to help melt the chips
DIRECTIONS:
  1. Spray or line a 9x13 inch pan with parchment paper or tin foil.
  2. Break or crush the graham crackers into smaller pieces. (I put the crackers in a plastic bag and rolled them with a rolling pin to make a fine crumble.  You may like yours more chunky.  You really can't go wrong here.)
  3. In a saucepan, melt the butter and peanut butter together, stirring until smooth. Remove from the heat and set aside.
  4. In a large bowl, mix the crushed graham crackers and powdered sugar. Once mixed, add in the peanut butter mixture, and mix to combine.
  5. Spread the peanut butter graham cracker mixture evenly into the pan.
  6. In a microwave-safe bowl, combine chocolate chips and oil.  Microwave on medium for a minute at a time, stirring in between, until melted.
  7. Pour the chocolate over the peanut butter layer.
  8. Cover the pan and refrigerate for 30 minutes or until they are set.
  9. Cut into bars and enjoy!

Difficulty: easy
Time: about 1 hour, including cooling time
Source: adapted from http://thefirstyearblog.com

Tuesday, December 1, 2015

Cranberry Chocolate Chip Cookie Ball Jar Mix

For several years now (at least since my husband got me a stand mixer for Christmas), my kids and I have spent time around the holidays making many different kinds of cookies to give to friends, family, and teachers as gifts.  This year, we have decided on a variation of this idea and are giving these beautiful quart ball jars filled with a layered mix for the recipients to make nearly four dozen cookies.  My kids and I have enjoyed the time that we have spent making these gifts, and they have shouted out names that they have assigned to each one as we build them, assembly-line style.  Many of the jars that we have made are going to their teachers, who certainly deserve a treat!

INGREDIENTS:
  • 1-1/4 cups all purpose flour
  • 1 tsp baking soda
  • 1/2 tsp salt
  • 1/2 tsp ground cinnamon
  • 3/4 cup packed brown sugar
  • 1 cup (6 oz) semisweet chocolate chips
  • 1/2 cup dried cranberries
  • 1/2 cup chopped walnuts
  • 1/2 cup quick-cooking oats
ADDITIONAL INGREDIENTS:
  • 2/3 cup butter, softened
  • 1 egg
  • 3/4 tsp vanilla extract
DIRECTIONS:
  1. In a small bowl, combine flour, baking soda, salt and cinnamon. In a 1-qt. glass container, layer flour mixture, brown sugar, 1/2 cup chocolate chips, cranberries, walnuts, oats and remaining chips. Cover and store in a cool dry place up to 6 months. Yield: 1 batch (about 4 cups total).
  2. TO PREPARE COOKIES: Preheat oven to 350 degrees In a large bowl, beat butter, egg and vanilla until blended. Add cookie mix and mix well.
  3. Drop by rounded tablespoonfuls 2 in. apart onto ungreased baking sheets. Bake 10-15 minutes or until golden brown. Remove to wire racks. Yield: 2-1/2 dozen.

Feel free to print this tag to use with your cookies!

Difficulty: Easy - my kids helped with most of the prep
Time: Depends on how many jars you are making at a time.  I would estimate less than 10 minutes each.  To make the cookies will take another 20-30 minutes.
Source: www.tasteofhome.com (template for the gift tag is from www.squawkfox.com)

Monday, April 27, 2015

Almond Brownies

We are pumped to post this brownie recipe for several reasons.  First, this recipe is a sneak preview of Tia Mowrey's, whose show Tia Mowry at Home premiers on The Cooking Channel on Wednesday, April 29th at 9:00pmET/6:00pmPT.  Tia is a busy mom herself, and we are thrilled to have been asked by The Food Network/The Cooking Channel to give her recipe a try in our Busy Moms' kitchens.

Second, I am excited to share this recipe because, well, these brownies are flat out awesome.  The prunes seem a bit unconventional, but the added sweetness and flavor mixed with the cocoa, mmmmmm.... And the best part? The sea salt sprinkled on top.  The combination of the sweet, almondy, chocolaty goodness and the salty topping provided by our favorite sea salt - Sea Love Sea Salt out of Wrightsville Beach, NC - is decadent and irresistible.  This one is so worth the splurge.

INGREDIENTS:

  • 2 tablespoons unsalted butter, at room temperature, plus more for greasing the pan
  • 1/2 cup almond butter
  • 2 large eggs
  • 3/4 cup sugar
  • 1/4 cup prune puree (I used baby food)
  • 2 teaspoons vanilla
  • 3/4 cup unsweetened cocoa powder
  • 1/2 cup whole-wheat flour
  • 1/2 teaspoon fine salt
  • 3/4 cup mini chocolate chips
  • 1/4 cup walnuts, chopped
  • 1/2 teaspoon flaky sea salt (try Sea Love's!)
DIRECTIONS:
  1. Preheat the oven to 325 degrees F. Grease an 8-by-8-inch pan with butter. Cut a piece of parchment to hang over 2 sides of the pan.  Mix together the butter and almond butter by hand in a large mixing bowl. Beat the eggs in a small bowl, then add them to the butter mixture. Mix in the sugar, prune puree and vanilla.
  2. Whisk together the cocoa powder, flour and salt in a separate bowl. Gently stir the flour mixture into the wet ingredients. Mix by hand just until combined; do not over-mix. Stir in the chocolate chips and walnuts. Pour the batter into the prepared pan. Sprinkle with the flaky sea salt.
  3. Bake until a toothpick inserted in the middle of the brownies comes out clean, about 30 minutes. Remove to a wire rack to cool, and then cut into squares.

Difficulty: medium
Time: 1 hour 20 minutes (includes 20 minutes prep as well as cooking and cooling time)
Source: Tia Mowry at Home- Premiering Wednesday, April 29th at 9:00pmET/6:00pmPT - SERIES PREMIERE! (COOKING CHANNEL)

Monday, February 2, 2015

Why Skip Dessert? - Special Guest Post!


We are thrilled to present a guest post by Alyssa Gangeri, an NYC chef and author of the brand new children's book Mimi's Adventures in Baking Chocolate Chip Cookies. As a child, Chef Alyssa loved baking and everything that came with it. As an adult and food lover she realized there was something missing when she frequented bookstores: an interactive children's cookbook. And we are not talking about a boring old cookbook for kids with lots and lots of recipes and some pictures. Children these days have just as much interest in the kitchen as their parents do, but the ordinary cookbook is just not going to cut it. She created Mimi's Adventures in Baking to give children and adults a way to get into the kitchen and allow the child to become the chef and the adult the assistant. Each book has one recipe and an interactive story line the child can read, and at the end go into the kitchen and do what Mimi did! And for the "non-baking" parent, these elite pastry chef recipes are tested and ready for even the most inexperienced baker!

Why Skip Dessert? 

That is the question? Why would you ever skip dessert? As a pastry chef and now children’s book author, I encounter a lot of people that spend countless hours preparing a wonderful dinner and skip dessert! The horror! Maybe it’s the pastry chef in me, or the inner child in me but come on who doesn't love dessert?

One thing I have learned is that desserts and pastries are very intimidating to prepare and most cooks are completely frightened by the baking process. It’s a science; everything thing needs to be exact down to the correct measurements, to the perfect bake time. Which, understandably, is very intimidating. While on my road to being published I started working with my recipes to make them kid-friendly and most importantly mom-friendly. Baking is something you can enjoy doing together. It’s an experience that can last a lifetime and shape your children into who they become. Learning discipline, counting, measuring, following directions and safety are very important. We all need dessert to survive… I mean, food to survive.

Okay, so let me get to my point. If I said you can make one of the best classic desserts but in a whole new way and it is fool-proof, would you believe me? If I told you that you could make a dessert that will make your whole family happy in less than 30 minutes, would you believe me? Well, believe it because it’s true!

I love recreating classic children’s desserts in a whole new form that even your dinner party guests will "oooh" and "ahhh" over. I think classic children's desserts are nostalgic and immediately bring back memories. Desserts are supposed to be fun and make people happy… hence, why would you ever skip dessert? It’s worth the calories and we all know it. Don’t deny it. No judgment here!

I am going to show you a nostalgic dessert that will wow guests or your family.

Meet the No Bake S’mores Pot de Crème… oh that’s right you heard me! I like to do them in little coffee mugs; I think it gives them a cute look and any dessert in a cup people love. Who wouldn't love to pick up their cup and go to town on a chocolate s’mores pot de crème? And let’s be honest -just the name sounds impressive!


Chocolate Pot de Crème

(makes 4-6 servings depending upon the size of your mug. I like to use smaller mugs because it’s so rich)

INGREDIENTS:
  • 1 1/3 cups Half and Half
  • 2 whole large Eggs
  • 3 Tablespoons granulated sugar
  • 2 ¼ cup dark chocolate chips
  • Marshmallows to top with
  • Graham Crackers for décor

DIRECTIONS:

This is a no bake product so what you are going to do is: start off by bringing your half and half to a boil. Once boiled, combine your eggs and sugar together and whisk until fully incorporated and eggs are scrambled. Place the bowl with your egg mixture on a dish towel to ensure while whisking it won’t move around on you.

Slowly pour your hot half and half over your eggs while whisking at the same time to ensure you do not scramble your egg.

Once you have add all of your half and half to the egg mixture and it is fully incorporated, you can then add in your chocolate. Whisk until fully melted and incorporated. If you still have some little chunks, feel free to place your bowl in the microwave to warm your mixture. Stir every 30 seconds.

Once your mixture is fully combined, time to pour into your cups. (Yes that’s it! Nothing else!)

Place your filled cups in the refrigerator for about 20 minutes or until set. You can always pop them in the freezer if you’re in a rush as well. They just need to cool completely to set.

Next and final step… Top with those lovely marshmallows. For you dessert lovers that have a mini blow torch break it out and fire away! For all of you regular people that don’t but everything you see in Williams Sonoma feel free to use your broiler for this step. I like to put my broiler on high, and place your cups on a sheet pan and stay close! Watch as your marshmallow caramelizes. Pull them once they have reached the desired toasted color. (This will not take long so DO NOT leave the oven. Keep the door open and watch them.) Once finished, place a piece of graham cracker in and serve! It’s that easy! So now you have no reason to skip dessert and everyone is going to be talking about your S’more Pot de Crème for days! Be prepared to have to make them again… just forewarning you!

Happy Baking Everyone!

Follow the entire Mimi’s Adventures in Baking Tour HERE

Chef Alyssa's Website / Twitter / Facebook

Mimi’s Adventures in Baking Chocolate Chip Cookies releases
in March 2015!

Pre-Order now:

Thursday, March 13, 2014

Overnight German Chocolate Oatmeal

I don't know why it took me over half of the school year, but I finally bought my son a insulated container so that he can take hot foods to school for breakfast.  This simple $5 purchase has opened a world of possibilities for healthy breakfasts for him.  As an oatmeal fan myself, the first morning we had the container, I made him a packet of oatmeal.  It was great, but the packets have their limitations, including cost and sugar content.  Enter steel cut oats cooked overnight.  Chocolate steel cut oats cooked overnight.  Chocolate steel cut oats with brown sugar and walnuts.  So. Good.  And even though you add brown sugar as a topping (it melts so perfectly), you control the sugar content and there is still less than in most packets of oatmeal.  This recipe makes a large quantity, so after the first day all I do is heat it up in the morning and throw on some toppings.  Who wouldn't like (healthy) German Chocolate for breakfast?

INGREDIENTS:
The only other ingredient is water (plus some optional toppings)!
  • 2 c. steel cut oats
  • 7 c. water
  • 1 (13.5 oz.) can lite coconut milk
  • 1/4 c. unsweetened cocoa powder
Optional toppings:
  • Brown sugar
  • Chopped pecans or walnuts
  • Sweetened, shredded coconut
DIRECTIONS:
  1. Stir together oats, water, coconut milk, and cocoa powder in a slow cooker.
  2. Cover, and cook on low for 6-8 hours.
  3. To serve, top (in order) with brown sugar, pecans, shredded coconut to taste.
My husband calls this "No Bake Cookie Oatmeal."

Difficulty: very easy
Time: 5 minutes to prep, 6-8 hours to cook in slow cooker


Monday, April 29, 2013

Chocolate Chip Cheese Ball

Once upon a time, I went to parties and picnics with my family and I was young enough to not have to bring food to contribute.  My parents took care of that.  When the time finally came for me to attend a "grown up" party on my own and I was asked to bring an appetizer or dessert, this was one of the first things that I chose to make.  Straight out of my mom's recipe box, I have also made it many a time for get-togethers at my own house.  No matter the occasion, it is always a hit.  The only problem people seem to have is that once you start, you just can't stop eating it!

INGREDIENTS:
  • 1 8 oz. package cream cheese, softened
  • 1/2 cup butter, softened (do not substitute spread or margarine)
  • 1/3 tsp. vanilla
  • 3/4 cup confectioners' sugar
  • 2 Tbsp. brown sugar
  • 3/4 cup mini semi sweet chocolate chips
  • 3/4 cup finely chopped pecans
  • pretzels and/or graham cracker sticks for dipping
DIRECTIONS:
  1. Mix cheese, butter and vanilla until fluffy. Add sugars gradually and beat until combined.
  2. Stir in chips. Cover and refrigerate 2 hours or overnight. 
  3. Place on large sheet of plastic wrap. Shape into ball.  Wrap and refrigerate at least one hour.
  4. Before serving, roll in pecans. Serve with chocolate graham crackers.


Difficulty: easy, though this isn't a last-minute appetizer and is definitely easier if you have a stand mixer
Time:  the hands-on time is minimal - maybe 15 minutes.  However, there is refrigeration time necessary.
Source: my mom - many, many years ago