Monday, December 21, 2015

Cheesy Twice-Baked Butternut Squash

Just when I thought I had found my favorite butternut squash dish, this one came along and rose quickly to the top.  In fact, after our CSA squash was exhausted, I found myself shopping for more at the grocery store.  I doubled this recipe and took it to Thanksgiving dinner at my parents' house, where the small amount that was left after dinner was gone by the end of the evening as people went back for more.  I have even made it a couple of times since Thanksgiving, taking advantage of the seasonal produce sales.  This is my kids' and husband's favorite way to eat butternut squash, hands down.

INGREDIENTS:
  • 1 butternut squash (~2 lb.)
  • 1 cup water
  • 3/4 cup Shredded Sharp Cheddar Cheese
  • 1/2 cup Sour Cream
  • 1 Tbsp. chopped fresh chives
  • 1/8 tsp.  paprika
  • 6 RITZ Crackers, crushed (about 1/4 cup)
  • 1 Tbsp. butter, melted
DIRECTIONS:
  1. Heat oven to 425ºF.
  2. Cut squash lengthwise in half; scoop out seeds. Add water to 13x9-inch baking dish; place squash, cut sides down, in dish. Cover.
  3. Bake 40 min. or until squash is tender when pierced with knife. Cool 10 min. Transfer squash to cutting board; drain liquid from dish.
  4. Scoop out squash into medium bowl, leaving 1/4-inch-thick shells. Add cheese, sour cream, chives and paprika to squash flesh; mix well. Spoon into shells. Mix cracker crumbs and butter; sprinkle over squash. Return to baking dish. Alternatively: Rather than putting the mixture back into the shells, you can put it into a small baking dish.
  5. Bake 22 to 24 min. or until heated through.
Difficulty: Easy
Time: about 1 hour and 20 miutes, most of which is hands-off time

Tuesday, December 1, 2015

Cranberry Chocolate Chip Cookie Ball Jar Mix

For several years now (at least since my husband got me a stand mixer for Christmas), my kids and I have spent time around the holidays making many different kinds of cookies to give to friends, family, and teachers as gifts.  This year, we have decided on a variation of this idea and are giving these beautiful quart ball jars filled with a layered mix for the recipients to make nearly four dozen cookies.  My kids and I have enjoyed the time that we have spent making these gifts, and they have shouted out names that they have assigned to each one as we build them, assembly-line style.  Many of the jars that we have made are going to their teachers, who certainly deserve a treat!

INGREDIENTS:
  • 1-1/4 cups all purpose flour
  • 1 tsp baking soda
  • 1/2 tsp salt
  • 1/2 tsp ground cinnamon
  • 3/4 cup packed brown sugar
  • 1 cup (6 oz) semisweet chocolate chips
  • 1/2 cup dried cranberries
  • 1/2 cup chopped walnuts
  • 1/2 cup quick-cooking oats
ADDITIONAL INGREDIENTS:
  • 2/3 cup butter, softened
  • 1 egg
  • 3/4 tsp vanilla extract
DIRECTIONS:
  1. In a small bowl, combine flour, baking soda, salt and cinnamon. In a 1-qt. glass container, layer flour mixture, brown sugar, 1/2 cup chocolate chips, cranberries, walnuts, oats and remaining chips. Cover and store in a cool dry place up to 6 months. Yield: 1 batch (about 4 cups total).
  2. TO PREPARE COOKIES: Preheat oven to 350 degrees In a large bowl, beat butter, egg and vanilla until blended. Add cookie mix and mix well.
  3. Drop by rounded tablespoonfuls 2 in. apart onto ungreased baking sheets. Bake 10-15 minutes or until golden brown. Remove to wire racks. Yield: 2-1/2 dozen.

Feel free to print this tag to use with your cookies!

Difficulty: Easy - my kids helped with most of the prep
Time: Depends on how many jars you are making at a time.  I would estimate less than 10 minutes each.  To make the cookies will take another 20-30 minutes.
Source: www.tasteofhome.com (template for the gift tag is from www.squawkfox.com)

Tuesday, November 10, 2015

Pumpkin Lust Cake

I make the Pumpkin Dump Cake every year for our Thanksgiving dinner; it is heavily requested by my family. Last year, I wanted to try something new.  I caught sight of an amazing looking layer dessert on Facebook or Pinterest in October.  I couldn't find it again on my boards or my wall, but the name stuck with me; I turned to Google.

I found a few pictures and captions explaining the dessert. A few days before Thanksgiving I set out to find the ingredients...I could not find the pumpkin spice instant jello.  I know it exists because I've bought it before...so I improvised.  I added canned pumpkin to vanilla pudding in small amounts until I hit a good flavor.

Everyone who tasted the dessert loved it!  It was quite refreshing compared to the richer pumpkin dump cake.


INGREDIENTS:

  • 1 stick butter, melted
  • 1 cup flour
  • 1 cup pecans, chopped
  • 2 tsp sugar
  • 1 8 oz cream cheese, softened
  • 1 cup powdered sugar
  • 2 8 oz whipped topping, divided
  • 2 small Jello instant vanilla pudding 
  • 1/2 cup pure pumpkin (this gave a light pumpkin taste, you may want to add more)
  • 1 T pumpkin pie spice
  • 3 cups cold milk
  • pinch of nutmeg


DIRECTIONS:


  1. Preheat oven to 375 degrees Fahrenheit.  Mix butter, pecans, sugar, and flour.  Press into 9 x 13 baking dish.  Bake 10-15 minutes.  Cool completely.
  2. Mix cream cheese, powdered sugar, and 1 1/2 cup cool whip until smooth.  Spread over cooled crust.
  3. Mix pudding with milk.  Add pumpkin and spice and continue to whisk.  Set in fridge 5-10 minutes to set.  Spread over cream cheese layer.
  4. Top with remaining whipped topping.  Sprinkle with nutmeg to garnish. Refrigerate.


Difficulty: Medium; there are steps and cooling time to deal with
Time: 60 minutes
Source: adapted from a few recipes I found on pinterst


Monday, November 2, 2015

Quinoa Salad with Butternut Squash

I am getting a bit sad that we will shortly be receiving our last of the produce from our CSA.  I have really loved the fresh fruits and veggies and the adventure that has come with figuring out what I will make next and how to use some of the ingredients that I am not so familiar with (like the fennel that came in a recent bag).  Generally speaking, the later bags of the season are filled with a variety of wonderful squashes, and I am always seeking that one special recipe that uses them.  I think I have found that recipe for butternut squash.

My family is a big fan of dried cranberries (hence, the Costco-sized bag) and we are all growing more and more fond of the nutrition powerhouse quinoa.  This recipe is a great side dish, full of fall flavor, and one that would make a perfect addition to a Thanksgiving table . I found that I loved it even more as leftovers, after the flavors all had a chance to meld together.

INGREDIENTS:
  • 1 butternut squash
  • Olive oil
  • Salt and freshly ground black pepper, for seasoning squash
  • 2 cups quinoa
  • 4 cups water
  • Pinch of salt
  • 1 cup dried cranberries
  • 1 cup pepitas (these are actually the insides of pumpkin seeds; I got mine in the nuts and seeds section of our grocery store)

For the Citrus Honey Dressing:
  • Juice of 3 large oranges (I used about 1 cup of no sugar added OJ)
  • Zest of 1 large orange
  • 1/4 cup olive oil
  • 1 tablespoon honey
  • Salt and freshly ground black pepper, to taste
DIRECTIONS:
  1. To prepare the squash: chop off the ends and poke holes in the skin with a fork.  Microwave it for 3-4 minutes.  After letting it cool, peel the skin off with a vegetable peeler.  Cut into 1/2 inch cubes.
  2. Preheat the oven to 400 degrees F. Place butternut squash on a large baking sheet. Drizzle with olive oil. Toss until squash is well coated. Season with salt and pepper. Roast the squash for 30 minutes, turning once, until tender.
  3. While the butternut squash is roasting, cook the quinoa. Add quinoa, water, and salt to a medium saucepan and bring to a boil over medium heat. Boil for 5 minutes. Turn the heat to low and simmer for about 20 minutes, or until water is absorbed. Remove from heat and fluff with a fork. Let cool quinoa cool to room temperature.
  4. In a large bowl, combine quinoa, butternut squash, dried cranberries, and pepitas. In a small bowl, whisk together the orange juice, zest, olive oil, and honey. Season with salt and pepper, to taste. Drizzle over quinoa salad. Toss until ingredients are well dressed. Season with salt and pepper, to taste.


Difficulty: Medium - only because of the squash prep
Time: about 40 minutes, but not all of that is active (the squash takes a while to roast)
Source: Adapted from www.twopeasandtheirpod.com

Tuesday, October 20, 2015

Roasted Veggie and Sausage Pasta

I am not sure if I love roasted veggies or grilled veggies more but I know they both make my mouth water.  This recipe uses a variety of vegetables - feel free to customize it to your tastes or what you have on hand.  Since several of the steps are concurrent (boil and cook pasta while browning sausage and roasting veggies), the time involved isn't too much and the wonderful, deep flavors meld together wonderfully once everything is combined.  My family has never once complained about eating their veggies with this meal!

INGREDIENTS:
  • olive oil
  • 8 oz mushrooms, quartered
  • 2 small bell peppers
  • 1 small summer squash or zucchini
  • 1 medium red onion
  • 1 small sweet yellow onion
  • 1 14.5 oz can diced tomatoes
  • 3/4 lb sweet Italian sausage
  • 3/4 lb pasta (I used fusili)
  • sea salt
  • pepper
  • optional toppings: fresh basil, oregano, shredded Parmesan (I used all three and it was amazing)
DIRECTIONS:
  1. Preheat oven to 450 degrees Fahrenheit.  Line two baking sheets with foil.  Begin boiling water for pasta.
  2. Slice squash lengthwise to quarter and then cut into 1/2 inch pieces. Chop peppers and onions.  Spread on one of the foil-lined sheets, drizzle with about 2 Tbsp olive oil and gently stir to coat.  Sprinkle with salt and pepper.
  3. Place mushrooms on the second foil-lined baking sheet, drizzle with oil and toss to coat.
  4. Bake vegetables for 10 minutes, gently stir, and then place back into the oven for another 5-10 minutes longer, or to desired tenderness.  (You may want to leave the mushrooms in longer than the other veggies.)
  5. As the veggies are cooking, cook pasta according to package directions and brown and drain sausage.
  6. Add the can of diced tomatoes, with juices, to the sausage.  Cook for 5 minutes.
  7. Combine sausage, veggies, and pasta.  
  8. Serve topped with fresh oregano, basil, and shredded Parmesan cheese.

Difficulty: relatively easy but with some chopping
Time: 30-40 minutes
Source:  This one is my own...and is much loved by my family.

Monday, September 28, 2015

Whole Wheat Banana Nut Muffins

My husband and I teach at a different school than the one that our kids attend.  For the most part, this is a non-issue.  However, the fact that we don't always have the same schedule as our kids can sometimes be a childcare nightmare.  At the beginning of the year, John and I had five days for which we needed someone to watch our kiddos because they hadn't started school yet.  And "someone" really turned out to be a village.  Between family, friends, and neighbors, the outpouring of offers to help was awesome.  When I took my kids to their home for the day, I wanted to bring something that everyone could enjoy as a breakfast treat.  Yet, I didn't want to "sugar up" my kids for someone else to deal with.  (I can be considerate like that.)  I was also interested in using my overripe bananas and the whole-wheat flour that I had on hand.  Enter this recipe, which seems to have a perfect balance of ingredients for a filling treat that is not too sweet for breakfast.

INGREDIENTS:


  • 1½ cups whole-wheat flour
  • ¾ teaspoon baking soda
  • ½ teaspoon salt
  • ¼ teaspoon baking powder
  • 2 eggs
  • ½ cup (1 stick) butter, melted OR 1/2 cup Coconut Oil, melted
  • ⅓ cup pure maple syrup
  • 2 very ripe bananas, peeled (the riper they are the sweeter they'll be)
  • ½ cup chopped walnuts (optional)


DIRECTIONS:

  1. Preheat the oven to 350 degrees F. Line a muffin pan with paper or silicone liners and set aside.  (This recipe makes 12 full-sized muffins or 36 mini muffins.)
  2. In a large bowl whisk together the flour, baking soda, salt and baking powder. Make a well (hole) in the center of the flour mixture and drop in the eggs, butter, and syrup. Mix with a fork until it just comes together and set aside.
  3. In a small bowl mash the two bananas together with the back of a fork. Carefully fold the bananas and walnuts (if using) into the muffin batter and distribute evenly into the 12 muffin cups (or 36 mini muffin cups). Bake until they begin to brown on top and a toothpick comes clean when inserted in the center, about 20 to 22 minutes for regular sized muffins or 12 to 14 minutes for mini muffins.


Difficulty: easy as far as baking goes
Time: 10 min prep and 20-22 min baking
Source: http://www.100daysofrealfood.com

Monday, September 14, 2015

Sausage and White Bean Orecchiette

For a long time, pasta was something that my family ate multiple times per week.  As I look back, I realize that we have made a gradual (kind of unintentional) shift away from eating as much pasta and we tend to have more brown rice, quinoa, etc. in our meals alongside our veggies and protein.  That isn't to say that we don't eat pasta - absolutely unfathomable!  We just have fewer meals where pasta is the main component.

This meal is a great way to increase the protein and veggie components of a meal while still including pasta - there is just a smaller proportion of pasta per serving than you may be used to.  Instead, protein-packed white beans take up some of that space, and yummy sausage and veggies take up the rest.  I LOVE this meal, and my kids do, too!

INGREDIENTS:

  • 1 Tbsp. Olive Oil
  • 12 oz. sweet Italian sausage (bulk)
  • 1 small onion, chopped
  • 2 medium zucchini, chopped
  • 1 red, yellow, or orange pepper
  • 1 15 oz can cannellini or other white beans, drained and rinsed (no salt added recommended)
  • 1 tsp crushed rosemary (or 1 Tbsp fresh, finely chopped)
  • 1/2 tsp Sea Salt (omit and salt to taste if using salted beans)
  • 8 oz. dried orecchiette pasta
  • Freshly ground pepper
  • Grated Parmesan cheese
DIRECTIONS:

  1. Follow package instructions to cook pasta.  Once prepared, drain and reserve 3/4 cup of cooking water.
  2. While the water boils and pasta cooks: In large skillet, heat oil over medium heat.  Brown sausage, breaking it up as it cooks.  Transfer sausage to a bowl using a slotted spoon and set aside.
  3. Discard all but 1 Tbsp of the fat left in the skillet and return to medium heat.  Add the onion and pepper and cook until tender, 6-8 minutes.  Add zucchini and cook until just tender and beginning to brown, about 4-6 minutes.  Add beans, rosemary, and salt.  Cook 1-2 minutes more or until beans are heated through.
  4. Stir pasta and reserved sausage into the skillet mixture.  Stir in cooking water, 1 Tbsp at a time to create a sauce of desired consistency.  Season with pepper and top with cheese.

Difficulty: easy
Time: about 35 minutes
Source: Adapted from December 2014 Parents Magazine


Monday, August 31, 2015

Andrew's Joe

My son Andrew LOVES sloppy joes.  We learned that he couldn't get enough of them while on vacation. My dad thought it would be a great meal through the week for lunch; no one anticipated Andrew eating so much.  My dad used canned sloppy joe products to make them.

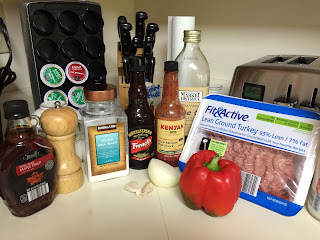
I wanted to take advantage of Andrew's love of a food, but make it healthier for our family.  You may or may not choose to add the beans to your sloppy joes; we are trying to increase fiber and protein in our diets so this is an easy way for me to do so.

While the kids will eat the meal on whole grain buns each night, John and I prefer to switch it up. Last night, we ate our leftovers over baked zucchini.  You could enjoy it over quinoa, pasta, or on lettuce leaves. 

INGREDIENTS:
Imagine black beans and tomato sauce
  • Onion, chopped
  • Bell pepper, chopped (I used red so it blended in more)
  • 2 cloves garlic, chopped
  • 1 pound ground turkey
  • 1 can black beans, rinsed (optional)
  • 1 T olive oil or cooking spray
  • salt
  • tomato sauce
  • 1 tsp Worcestershire sauce
  • 2 t hot pepper sauce
  • 2 t maple syrup 


DIRECTIONS:
  1. Heat oil in large skillet.  Add onion and bell pepper. Cook 4 minutes. Add garlic. Stir and cook an additional minute.  Set aside mixture in bowl.
  2. Brown turkey in the same skillet.  Season with salt and pepper to taste.
  3. Add mixture back to skillet, tomato sauce, Worcestershire sauce, pepper sauce, and syrup. Mix well. Reduce heat. Allow to thicken over medium-low heat for 15 minutes.


DIFFICULTY: Easy
TIME: 25 minutes
SOURCE: Adapted from Fixate


Tuesday, August 25, 2015

Fresh Fridge Pickles

I like cucumbers.  My daughter LOVES them.  My husband won't touch them.  My son can't even stand to be in the same room as them.  Very rarely does a food cause such a divide in our house.

We've had a decent amount of cucumbers come our way this summer, and with only two of us eating them, I was definitely tiring of the chopped-on-salad variety and ready for something new.  This easy pickle recipe almost seemed too good to be true.  With so few ingredients, there was certainly no harm in trying.  I absolutely loved them, and so did my neighbors who helped taste test with me. They were so good that I made a second batch.

Note: This recipe uses and yields 2 quart-sized mason jars.  I halved the recipe based on the number of cucumbers I had.

INGREDIENTS:
  • 8-10 pickling cucumbers or 5-6 regular cucumbers
  • 6 cloves of garlic, cut in half
  • 2 cups seasoned rice vinegar*
  • large bunch of fresh dill, washed.
DIRECTIONS:
  1. Wash and trim ends off cucumbers and cut into ⅛ inch slices.
  2. Put garlic slices in each mason jar and fill halfway up with cucumbers.
  3. Stuff a large handful of dill into jars.
  4. Add the rest of the cucumber and pour 1 cup of seasoned rice vinegar into each jar.
  5. Tightly put the lid on the jar and shake 2-3 times to blend the flavors.
  6. Place in fridge for 1 hour, shake again. The salt in the seasoned rice vinegar with draw out the cucumber juice so the jar will be full of liquid in a few hours. After about 2-3 hours, they taste pretty good, however they are far superior if left overnight.
*Please note: Seasoned Rice vinegar has both salt and sugar in it. If you prefer a more savory taste, use white vinegar instead and add 2 teaspoons of kosher or sea salt to each jar.


We may have eaten a few before this picture was taken...oops.

Difficulty: easy
Time: 10 minutes prep, 3+ hours resting time
Source: http://nancynewcomer.com/2014/09/01/fresh-easy-fridge-pickles/

Saturday, August 15, 2015

Breakfast Cookies

These cookies are awesome.  I first tried these cookies at work when I was having a rough day; my coworker told me to take two since they were small.  They appeared again at an end of year breakfast.  I will admit to actually putting a few leftovers in a baggie for my husband to try (the breakfast cookies were so good that I broke my rule about taking items from the staff room).  John loved them.  So I begged for the recipe, which I lost-twice.  After finally finding the recipe again, I made the cookies to rave reviews from the entire family.

These cookies have been great in lots of different situations for my family; they have worked perfectly for everyone. My husband and I are runners;two of these cookies are great as we head out on our long runs.  Then, I  made them for new neighbors as they were unloading their U-Haul.
Just yesterday, I made them for my friend who is always shuttling her boys to practices and games.

Everyone has enjoyed them. 

While I'd love to say that I can eat breakfast at home with my kids each morning, it is too hard given our early departure time. These cookies are easy to grab and go as well as being filling as we head to a packed day of school and work.

INGREDIENTS:
  • 1 cup coconut oil, softened
  • 1 cup brown sugar
  • 1/2 cup honey
  • 2 eggs
  • 1 t pure almond extract
  • 1 t pure vanilla extract
  • 1 1/2 cups whole wheat flour
  • 1 t baking soda
  • 1 T cinnamon
  • 3 cups old fashioned oats
  • 1 cup raisins
  • 1 cup Craisins
  • 1 cup flaked baking coconut
  • 1 cup slivered almonds
  • 1/4 cup flax seed
  • 1 T chia seeds

DIRECTIONS:

  1. Preheat oven to 350 degrees Fahrenheit. 
  2. In mixing bowl, cream together oil and sugars.   Add eggs and extracts; beat well.
  3. Add flour, baking soda, cinnamon, and oats. Mix.
  4. Fold in remaining ingredients and stir until blended.
  5. Drop by tablespoon onto cookie sheets. Bake for 14-16 minutes. 


DIFFICULTY: Medium..mostly because there are a lot of ingredients.  I often make two batches, one to eat and one to freeze. 
TIME: 15 minute prep; 15 minute baking time
SOURCE: I adapted this recipe from my friend; my changes were to make the recipe more clean. 

NOTE: If you don't have coconut oil, you can use 2 sticks of butter.  Also, you could exchange the honey for 1/2 cup sugar.  


Thursday, August 6, 2015

Kale and Fontina Panini


When my family first started getting the bulk of our fresh veggies through a CSA, we had to open our minds and taste buds to some new flavors.  Kale - hailed as a super food - was one that I really wanted to like but had a hard time in doing so.  I tried it many different ways - kale chips, in smoothies, in combination with other greens, and more - but the first recipe that I tried that I absolutely loved that had kale in it was this one.  Honestly, you could use just about any cheese that you have, but we really enjoyed the not-so-cheap fontina as a special treat.

INGREDIENTS:
  • 1 Tbsp extra-virgin olive oil
  • 1 small onion, finely chopped
  • 3 Tbsp balsamic vinegar
  • 1 clove garlic, minced
  • 8 cups chopped kale
  • 1/4 cup water
  • 1/4 tsp salt
  • 8-10 slices country bread (1/4 inch thick), preferably whole wheat
  • 1 cup fontina or Gruyere cheese, shredded
  • 1-2 medium tomatoes
DIRECTIONS:
  1. Heat oil in a large skillet over medium heat.  Add onion and cook, stirring frequently, until golden brown, 5-7 minutes.  Add vinegar and cook until almost evaporated, about 1 minute.  Add garlic and cook, stirring, until fragrant, about 30 seconds.  
  2. Add kale, water and salt (the pan will be full).  Stir, cover and cook, stirring occasionally, until the kale is wilted and the water has evaporated, about 5 minutes.  Remove from heat.
  3. To prepare panini: Preheat panini maker to high.  Coat one side of each slice of bread with cooking spray.  With the sprayed side down, spread the kale mixture on 4 slices of bread (about 1/2 cup per sandwich).  Top each with 1/4 cup cheese and 2 slices of tomato.  Top with the remaining bread, sprayed-side up.  Press in the panini maker until crispy, 3-5 minutes.
Note: If you do not have a panini maker, make these sandwiches in a skillet.  Place a medium pan on top of them and add four 15 oz cans to the pan to weigh it down.  Cook 2-3 minutes per side.


Difficulty: medium
Time:  ~40 minutes
Source: eatingwell.com magazine May/June 2014

Wednesday, July 29, 2015

Dreamsicle Fruit Dip & Giveaway

I struggle with getting my kids to eat healthy foods.  One way I have some success is by involving the kids in choosing foods, buying foods, and preparing foods. As I previewed The Best Homemade Kids' Snacks on the Planet by Laura Fuentes of Momables, I looked for recipes simple enough for the kids to help cook.

One of the lines from a recipe description rang true for me:
Truth be told, I came up with this easy recipe because sometimes calling it a pizza is a lot easier than getting my kids to eat fruit. 
I do this with my own children too-cookies, pizza, meatballs, and cake...the stuff my kids love. My kids enjoyed making the Blueberry Snack Cookie filled with rolled oats and ate a healthy serving of oatmeal which they ALWAYS refuse. Kids can need between 15-20 exposures to a new food before they readily eat it. Starting with oatmeal in a "cookie" works for us.

Fuentes's line about trying to associate something fun with a new recipe spoke to my teacher instincts. As I looked for easy, kid-friendly recipes to get the kids active in the kitchen, I started matching some of the recipes with well-known children's books.

  • Italian Flag Bites with Strega Nona
  • Crepes (there were tons of options for sweet or savory) with If You Give a Pig a Pancake 
  • Ninja Turtle Nuggets with The Foolish Tortoise
I am taking this philosophy into my younger children's day care to do a lesson on "Keeping Cool in the Kitchen." I'll be pairing this Dreamsicle Fruit Dip with two great books: Gregory the Terrible Eater and Eating the Alphabet. Another hint Fuentes and Parents Magazine recommend is using dips as a way to increase kids' acceptance of fruits and vegetables.

COMMENT BELOW FOR A CHANCE TO WIN The Best Homemade Kids' Snacks on the Planet


INGREDIENTS:
  • 6 ounces of vanilla Greek yogurt
  • 4 ounces cream cheese, softened
  • 1/2 cup frozen orange juice concentrate


DIRECTIONS:
  1. In a medium bowl, mix yogurt, cream cheese, and orange juice concentrate. Mix until thoroughly combined.
  2. Refrigerate until ready to serve.
  3. Serve with fruit. 
DIFFICULTY: Easy
TIME: 10 minutes
SOURCE: The Best Homemade Kids' Snacks on the Planet

We are thrilled to be able to offer a lucky winner a copy of The Best Homemade Snacks on the Planet! To enter, just leave a comment in the comment section below.  The contest runs until 9pm August 2, 2015.


Friday, July 24, 2015

Homemade Sports Drink

As you might imagine, I have a plethora of cookbooks.  These days, I am trying to pare down rather than add to the collection; the internet (and this website!) have been great for that.  But when given the opportunity to preview the new book by Laura Fuentes (whose blog I have long followed), The Best Homemade Kids' Snacks on the Planet, I realized that this will most definitely be a new addition to the very few and specially selected books that stay in reach on my counter.

Within three days of receiving the book, I had made five of the over 200 recipes, including: Maple Cinnamon Dip (I shared with guests at a gathering with fruit and it was a huge hit), Blueberry Crumble (which disappeared seemingly instantly), Carrot and Zucchini Bars (my neighbor tried these and immediately asked for the recipe), and Baked Zucchini Bites (I thought they may make them until breakfast, but not a chance).

I have since made more (I can't wait to try the Chocolate Chia Seed Mousse next!) but so far, the recipe that I have made most often has been this Homemade Sports Drink.  I am a water drinker, but as I am training for a half marathon, I often need something more after a run on these hot summer days.  I am always reluctant to share store bought sports drinks with my kids, and have never been crazy about them myself, especially with the sugar content.  But there is no questioning the ingredients in this drink, especially when using my favorite Sea Salt from Sea Love!  This easy drink has been my go-to after nearly every run since I got the book in the mail; it is refreshing, thirst-quenching, and helps me to replenish those lost electrolytes.  Plus, it is perfect for my kids after a hard day of play or sports activities.

With super simple snack ideas, drinks, mini-meals, frozen delights, and many no bake recipes, this book is an awesome compilation of recipes that I can feel good about feeding my family.  When stuck in a rut for snack ideas, I now know where I will turn.  I am sure that you will absolutely love this book and we have an opportunity for you to win a copy!

COMMENT BELOW FOR A CHANCE TO WIN THE BEST HOMEMADE KIDS' SNACKS ON THE PLANET  We are sorry - this giveaway has ended.

INGREDIENTS:
  • 3 cups cold water
  • 1 cup pineapple juice
  • 3/4 teaspoon sea salt (try Sea Love's!)
  • 1/8 teaspoon baking soda
DIRECTIONS:
  1. In a pitcher, combine water, pineapple juice, sea salt, and baking soda.
  2. Refrigerate until cold.  Serve over ice.

Difficulty: Super easy
Time: less than 5 minutes, plus time to cool
Source: The Best Homemade Kids' Snacks on the Planet

We are thrilled to be able to offer a lucky winner a copy of The Best Homemade Snacks on the Planet! To enter, just leave a comment in the comment section below.  The contest runs until 9pm August 2, 2015.  We are sorry - this giveaway has ended.


Wednesday, July 8, 2015

Grab & Go Egg Muffins

 Our family is usually a bit rushed.  To practice. To school. To the doctor. To a meeting.  To the store before the snow. It is important to me that my family have breakfast each day.  Some mornings we can enjoy eating together; other mornings, it is a grab and go type of day.

For those grab and go mornings, we can take 2 of these egg muffins. They really kept us full. John was surprised that he didn't need anything else.  I have taken one to work and heated it up for about 15 seconds; it was the perfect mid-morning snack.  We have also eaten them for lunch on Fridays when we try to avoid meat.

You can use any types of veggies you have lying around. I had a bag of mini-peppers and some collard greens, but I easily could have used spinach and mushrooms.


INGREDIENTS:

  • 12 eggs
  • 1/2 cup water
  • 1/2 t sea salt
  • 1/2 t garlic powder
  • 1/4 t cayenne pepper (or regular pepper)
  • 1 to 2 cups assorted veggies 
  • 1/2 cup feta cheese or 1/2 cup shredded mozzarella


DIRECTIONS:

  1. Line 12 cup muffin tin with liners; spray lightly with olive oil.
  2. Preheat oven to 350 degrees Fahrenheit.
  3.   Beat eggs in large bowl; add veggies, seasonings, and cheese.
  4. Pour into lined muffin tins to about half full. Bake 20-25 minutes or until toothpick inserted in center of egg comes out clean. 


DIFFICULTY: Easy
TIME: 15 minute prep (chopping veggies) 25 minutes baking time
SOURCE: a clean eating group I participated in


Monday, June 29, 2015

Roasted Beet Pesto Pizza

Beets and I have a long and sordid history.  I will not go into details, but let's just say that though I don't mind the taste of beets, that is about all on which we agree.  In fact, I have declared myself "beet sensitive" without going to the point of saying that I am allergic.  And yet, I keep trying.  I want to like beets, and I want them to like me.  I guess I am stubborn like that.

I have actually requested substitutions for beets with my CSA, but recently there was a mistake and I received beets in my produce bag.  I decided that it was an opportunity to forge ahead with my relationship and give it another go.  I came across this beet pesto recipe and the accompanying pizza recipe that used it and I decided that pizza may just be our common ground.  I was so right.

The pesto appealed to me because the beets are roasted first and then combined with many other yummy ingredients.  When you then put it on naan flatbread and top it with mozarella, spinach (or kale), and goat cheese?  Mmmmm...a match made in heaven.  And for the record, my kids couldn't get enough of this and my mom, an avid beet hater, loved it, too!


INGREDIENTS:

Pesto:
  • 1 cup red beets, chopped and roasted (about 1 medium beet) 
  • 3 cloves garlic, roughly chopped 
  • ½ cup walnuts, roasted 
  • ½ cup parmesan cheese, grated 
  • ½ cup olive oil 
  • 2 tablespoons lemon juice 
  • Salt to taste 
Pizza:
  • Naan bread
  • Mozzarella cheese
  • spinach or kale
  • Goat cheese
  • Pesto from above
DIRECTIONS:

For the pesto:
  1. Preheat the oven to 375 degrees F. 
  2. Wash and scrub the beet and pat it dry. Chop it into ½” cubes and place it on a sheet of foil. Wrap the chopped beet in foil, making a foil packet. Place the packet on a baking sheet. 
  3. Roast in the oven for 50 minutes, or until beets are soft and juices are seeping out. Allow beets to cool completely. (I did this the day before I made the pesto, while I was making another meal.)
  4. Add all ingredients except for the oil to a food processor or blender and pulse several times. 
  5. Leaving the food processor (or blender) running, slowly add the olive oil until all ingredients are well combined. If the pesto is too thick for your blender to process, add a small amount of water until desired consistency is reached 
For the pizza:
  1. Preheat oven to 415 degrees.
  2. Spread the pesto on the Naan bread or pizza crust.  Top with Mozzarella, spinach, and goat cheese.
  3. Bake 10-15 minutes or until cheese is melted appropriately.


Difficulty: easy, though a touch time-consuming if you don't plan ahead
Time: Pesto - Prep Time: 5 minutes, Cook Time: 50 minutes (there is also cooling time involved); Pizza - Prep Time: 2 minutes, Cook Time: 10-15


Tuesday, June 16, 2015

Marinated Kale Salad

My husband and I devoured this salad at a recent banquet. We even had a conversation about the salad with our table mates. I emailed the host on the drive home requesting this recipe.

The first time I made it I skimped on the infused vinegar and just used what I had at home; it was good, but when made as directed, it is amazing.  Kale is usually a product in my CSA.  I have used it for smoothies, baked chips, salads, and sauteed. This is by far my favorite use of kale.


INGREDIENTS:

Dressing
I forgot the Craisins.

  • 1/3 cup fig infused vinegar
  • 1/6 cup blood orange olive oil

Salad
  • 1 bunch chopped kale
  • 2/3 of a can of Mandarin oranges, reserve 3 T juice
  • 1/2 cup pine nuts, toasted and chopped
  • 1/3 cup Feta cheese
  • 1/4 cup Craisins, chopped
  • Salt and pepper to taste

DIRECTIONS:
  1. Marinate kale in dressing overnight. If possible, shake container a few times.
  2. Top with oranges, juice, Craisins, Feta cheese, and pine nuts.
  3. Add salt and pepper if necessary. 


DIFFICULTY: Easy
TIME: 15 minutes, but needs to marinate overnight.
SOURCE: a friend from church